Updating cabinet hardware and fixing those minor annoyances—like wobbly drawers or misaligned doors—is one of the most impactful upgrades you can make. From historic kitchens in Myers Park to modern condos in Uptown Charlotte, I've helped hundreds of homeowners restore functionality to their cabinets. In this 2026 guide, I'll cover both professional hardware installation and common repairs.
📐 Interactive Cabinet Hardware Estimator
Estimate the time, difficulty, and materials needed for your cabinet hardware project.
Why Proper Placement Matters
The difference between DIY and professional-looking results often comes down to consistent measurements. Eyeballing it leads to uneven spacing that stands out.
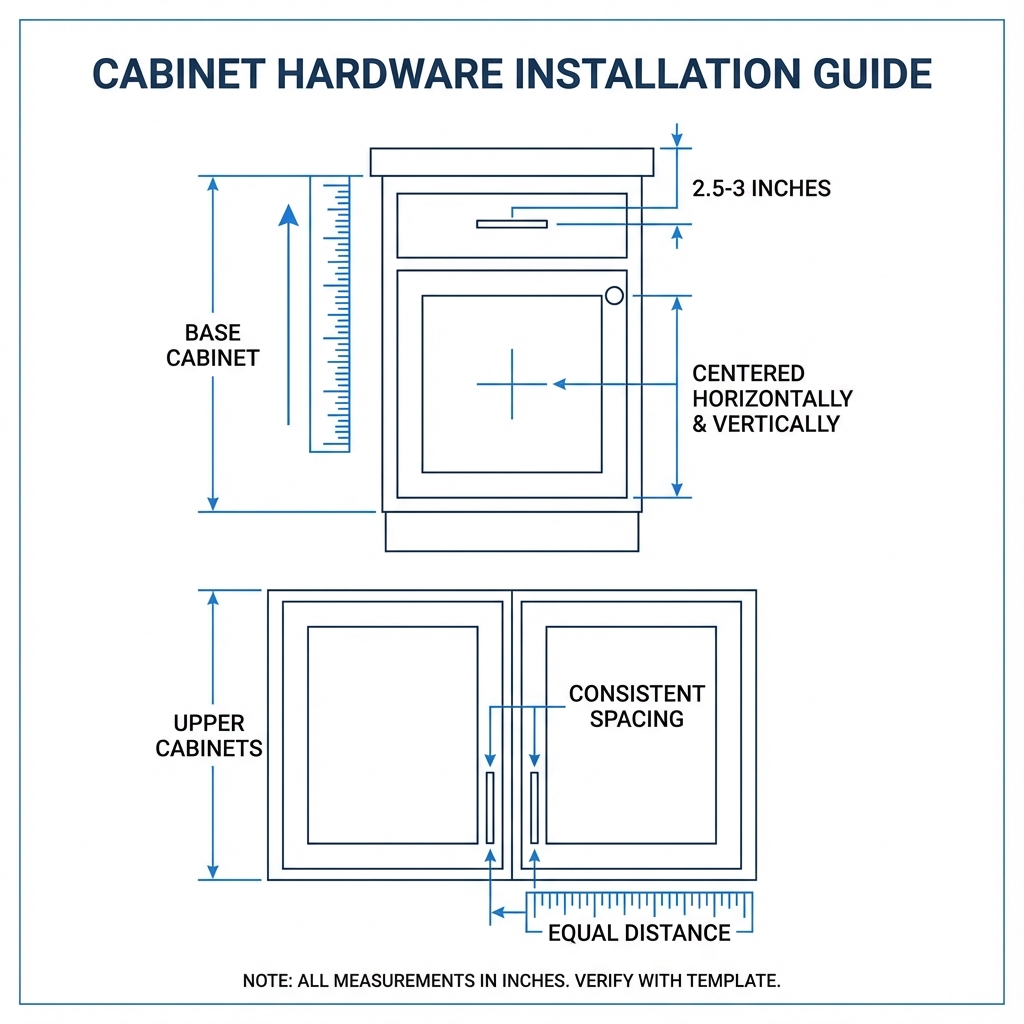
Professional hardware placement measurements
Choosing Between Knobs and Pulls
Knobs
- ✅ Best for: Small doors, traditional kitchens
- ✅ Single screw = easier installation
- ✅ Less expensive
- ❌ Harder to grip for large drawers
Pulls (Handles)
- ✅ Best for: Drawers, modern kitchens
- ✅ More comfortable to use
- ✅ Contemporary look
- ❌ Two screws = more precise measurement needed
Pro Recommendation
The most popular combo: Knobs on doors, pulls on drawers. This gives you traditional elegance with modern functionality.
Standard Measurements
Follow these industry-standard measurements for professional results:
Upper Cabinets (Doors)
- Knobs: 2.5" from bottom corner (both directions)
- Pulls: Centered horizontally, 2.5-3" from bottom
Lower Cabinets (Doors)
- Knobs: 2.5" from top corner (both directions)
- Pulls: Centered horizontally, 2.5-3" from top
Drawers
- Small drawers (under 24"): Single pull, centered
- Large drawers (24"+): Single pull centered, OR two pulls 3" from each edge
- Vertical placement: Centered on drawer face
Tools You'll Need
- Power drill with bits
- Tape measure
- Pencil
- Level
- Painter's tape (prevents drill-through damage)
- Hardware template (optional but highly recommended)
Step-by-Step Installation Process
Step 1: Create a Template
Make a simple jig from cardboard or buy a commercial template. This ensures every hole is in the exact same spot. This is the secret to professional results.
Step 2: Mark First Cabinet
Measure carefully on your first door/drawer. Use a level to ensure pulls are perfectly horizontal. Mark both screw holes with a pencil.
Step 3: Put Tape on Back
Place painter's tape where the drill will exit. This prevents splintering and chipping on the interior surface.
Step 4: Drill Pilot Holes
Use a drill bit slightly smaller than your screws. Drill straight through. Pro tip: Wrap tape around your drill bit to mark the depth.
Step 5: Install Hardware
Insert screws from the back, hand-tighten the hardware from the front, then give a final quarter turn with a screwdriver. Don't overtighten - you can crack the cabinet face.
Step 6: Repeat Consistently
Use your template for every cabinet. Consistency is key - one misplaced pull ruins the whole look.
Common Mistakes & How to Avoid Them
Mistake #1: Inconsistent Spacing
Solution: Always use a template or jig - never freehand your measurements.
Mistake #2: Wrong Drill Bit Size
Solution: Your pilot hole should be slightly smaller than the screw shaft, not the threads.
Mistake #3: Drilling Too Deep
Solution: Mark your bit with tape to prevent drilling into countertops or damaging the opposite side.
Mistake #4: Not Checking Screw Length
Solution: Measure your door/drawer thickness. Screws should be 1/4" shorter than the thickness to avoid poke-through.
Common Cabinet Repairs
Before installing new hardware, it's essential to ensure your cabinets are functioning correctly. Here are the most common repairs I perform for Charlotte homeowners:
1. Adjusting Misaligned Doors
If your cabinet doors are crooked or won't stay closed, the solution is usually in the hinges. Modern European hinges have three adjustment screws for height, depth, and side-to-side alignment. A few turns of a screwdriver can make them look brand new.
2. Fixing Sticky Drawer Slides
Old roller slides can bend or collect debris. Cleaning the tracks and applying a small amount of silicone lubricant often works wonders. If they're still sticking, replacing them with new soft-close slides is a worthwhile investment.
3. Stripped Screw Holes
If a hinge screw keeps spinning, the wood is likely stripped. I use the "toothpick and wood glue" method: fill the hole with a glue-dipped toothpick, let it dry, trim it flush, and re-drill a fresh pilot hole.
Charlotte Climate Considerations
Our humidity affects cabinet hardware and wood:
- Choose quality finishes - cheap hardware tarnishes quickly in humid climates.
- Stainless steel or brushed nickel hold up best.
- Wood can swell in the summer, requiring minor hinge adjustments.
Budget Guide
Typical Charlotte kitchen (15-20 cabinets):
- Budget: $50-75 (basic knobs/pulls)
- Mid-range: $100-200 (quality finishes)
- High-end: $300+ (designer hardware)
Installing cabinet hardware is a perfect weekend DIY project that
dramatically improves your kitchen's look. Take your time with
measurements, use a template, and you'll get professional results.
Need help or want a flawless installation guaranteed? I'm just a call away!