Drywall damage is inevitable in any home - whether from accidental impacts, settling, or water damage. The good news? Most drywall repairs are easier than you think. As a Charlotte handyman, I've repaired hundreds of drywall holes and cracks, and I'm sharing my professional techniques with you.
Types of Drywall Damage
Understanding what you're dealing with helps you choose the right repair method:
1. Small Holes (Less than 1 inch)
- Nail or screw holes from pictures
- Doorknob dings
- Fix: Spackling paste only
2. Medium Holes (1-6 inches)
- Accidental punches or kicks
- Furniture impacts
- Fix: Patch kit or California patch method
3. Large Holes (Over 6 inches)
- Major impacts or water damage
- Requires cutting and replacing drywall section
- Fix: Full drywall replacement section
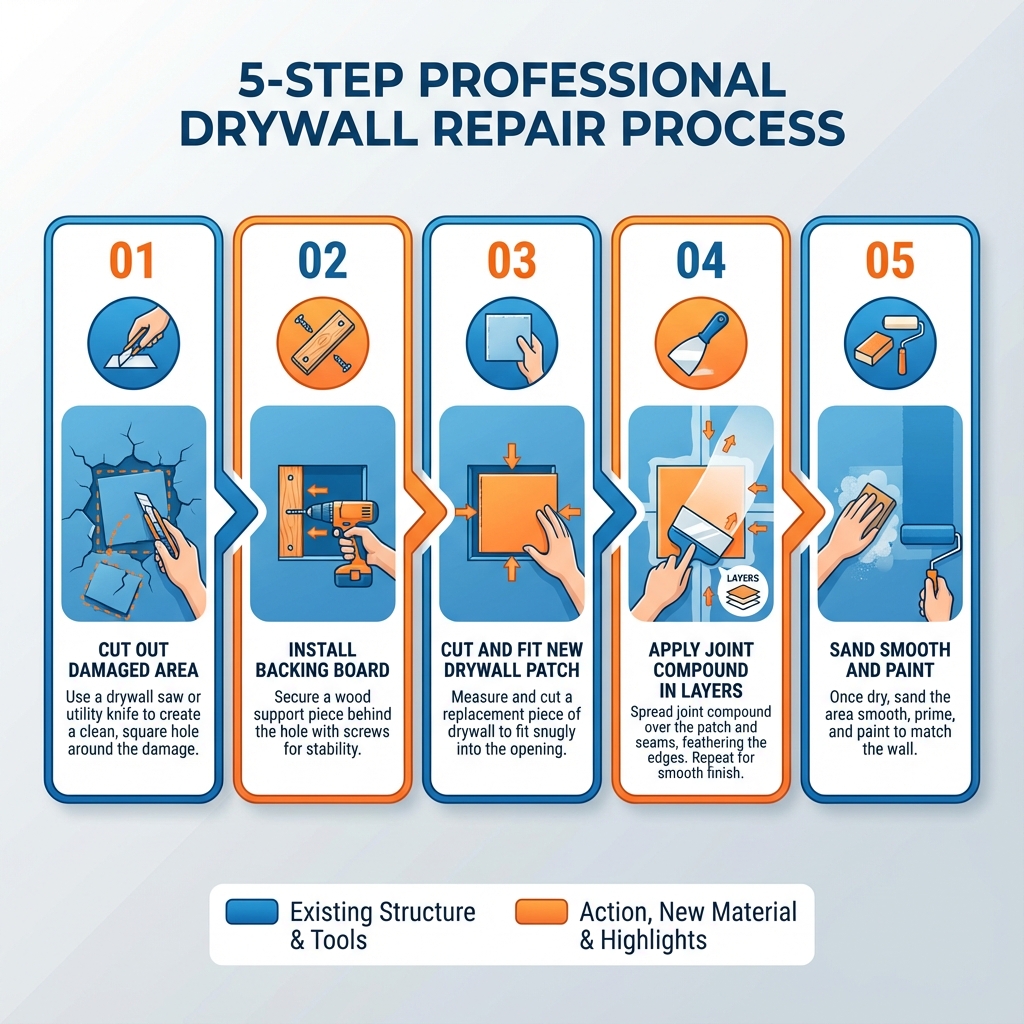
Professional 5-step drywall repair process
Tools & Materials You'll Need
Having the right tools makes all the difference:
Basic Toolkit
- Drywall saw or utility knife
- Putty knife (4-inch and 6-inch)
- Sanding block or pole sander
- Drill/screwdriver
- Tape measure
Materials
- Joint compound (premixed for ease)
- Drywall patch or scrap pieces
- Drywall screws
- Mesh or paper drywall tape
- 120 and 220-grit sandpaper
- Primer and paint
Step-by-Step: Repairing Medium Holes
This is the most common repair I do for Charlotte homeowners:
Step 1: Cut Out Damaged Area
Use a drywall saw to cut a clean square or rectangle around the damage. Pro tip: Square cuts are easier to patch than irregular shapes.
Step 2: Install Backing Board
Cut a piece of wood (1x3 or 1x4) slightly longer than your hole. Insert it behind the drywall and secure with screws on both sides of the hole. This gives your patch something to attach to.
Step 3: Cut and Install Patch
Cut a new piece of drywall to fit your hole exactly. Screw it to the backing board with drywall screws. Sink the screws slightly below the surface, but don't break the paper.
Step 4: Apply Joint Compound
This is where patience pays off. Apply compound in thin, multiple coats:
- First coat: Fill seams and cover screw heads
- Second coat: Wider, smoothing the edges
- Third coat: Feather edges 8-12 inches wide
Let each coat dry completely (24 hours) before the next.
Step 5: Sand and Paint
Sand smooth with 220-grit paper. Prime the patch, then paint to match your wall. Pro tip: Use a small roller for better texture matching.
Common Mistakes to Avoid
- ❌ Too-thick compound layers: Multiple thin coats beat one thick coat every time
- ❌ Not letting it dry: Rushing between coats causes cracks
- ❌ Over-sanding: You can sand through the paper - use a light touch
- ❌ Skipping primer: Primer seals the repair and ensures even paint coverage
Charlotte-Specific Considerations
Our Charlotte humidity can affect drywall work:
- Summer humidity slows drying time - allow extra time between coats
- Winter heating can over-dry compound - keep it covered while working
- Older Charlotte homes may have plaster - requires different techniques
When to Call a Professional
Some situations are better left to pros:
- Water damage (may indicate larger problems)
- Holes larger than 12 inches
- Ceiling repairs (difficult and messy)
- Multiple rooms needing repair
- Matching textured walls (skip-trowel, knockdown, etc.)
Drywall repair is one of the best DIY skills to learn - it saves money and empowers you to maintain your home. But if you're tackling a large project or need perfect results, I'm here to help. Give me a call and I'll get your walls looking like new!